Saturday, April 30, 2011

Pardon My French

If someone were to ask me to come up with one word to describe Kadee coupler springs, that word would be #$$@#$%^@#$$#^$#$@#&%^%^^**$%^$#!!!!!

It took me two solid hours to install two couplers on my scratchbuilt flatcar.  There are two coupler springs lost somewhere in the basement carpeting, they flew away and landed who-knows-where.  The aggravation was worth it, however - the couplers are installed, perfectly aligned, and they work flawlessly.


To commemorate the success, I made a short little video of the first official run of the flatcar, being pulled by #506.

Tuesday, April 26, 2011

Hey Neighbor, Can I Have That Weed?

Imagine it - it's a nice, warm Easter Sunday, the first warm day in weeks, and you're outside working in your garden.  Your next-door neighbor strolls over and asks "Can I have any large weeds that you find?".  You chuckle, politely, and say "Sure, no problem", while thinking to yourself "WTF is this guy on?".

Actually, my neighbor was a very good sport about it, and agreed to give me any weeds she pulls that have interesting roots on them.  I invited her and her husband in to see the layout, showed them some of my "root trees", and they were genuinely impressed.  In fact, she brought over some really neat clippings from some plant, asking if I could use them.  I have no idea what the plant is, but when I saw the clippings, I thought "there's a pine tree hidden in there":

I clipped off the little seed pods and trimmed it up a bit, then wrapped a very thin layer of fiber-fill around it.  A quick shot of gray and brown spray paint, a sprinkle of ground foam, and I have this:

It's not quite the pine tree that I had imagined, but it's a neat tree nonetheless.  Since I'm modeling late fall/early winter, I won't use it, not on this layout, but it's an interesting tree armature.  I may try another one, trimming the armature down even further.  One last photo, showing one of the original clippings side-by-side with the tree:

Monday, April 25, 2011

Dare I Say "It's Done"?

Four months ago, I started something that I never thought I was capable of doing - scratchbuilding a structure from the ground up.  Today, I installed what I believe were the final detail pieces.  I think it's done.


Crates full of apples and cabbages, waiting for the next train:

A bucket of REAL ashes sitting by the wood stove.  A single drop of white glue, in an HO scale pail, dipped into ashes from my fireplace:

A pitchfork in the corner, and a crate of apples waiting to go home with Old Man Johnson:

More crates waiting for the train.  Not sure what's in them, could be onions, apples, or even carrots.  Notice that the shelves in the background are empty - this picture was taken a couple of days ago:

A look through the (removed) end wall, also taken a couple of days ago:

And finally, one last full-frontal look:

That's it.  I'm done.  Next stop will be judging at the NMRA Thousand Lakes Region convention in May, and then a permanent place on my layout.  I'm not quite sure how to feel, this thing's been my evening entertainment for weeks!  Oh well, on to the next project...

Minor Facelift

The blog has attracted a lot of new visitors over the past few days, so I decided it was time to "spruce up the joint".  I made a snazzy new header image, changed the layout of the page, and have started assigning labels to the older posts.  The labels will make it easier to find past content, and I hope the layout changes make the site easier to read.

Let me know what you think, good or bad!

Friday, April 22, 2011

Scratch Car Fever

In order to obtain the NMRA's "Master Model Railroader" certificate, I have to (among other things) build, from scratch, four railroad freight cars.  I'm not ashamed to say that I find this intimidating, but it's also a challenge, and I rarely back down from a challenge.  Over the past few weeks, I've been reading everything I can find about scratchbuilding cars, trying to understand how the frames are constructed, what detail parts are involved, etc...

Due to the holiday weekend, I was able to escape work early today, and soon found myself standing in front of my work area, looking at a pile of basswood strips.  One thing led to another, those basswood strips were cut into various pieces, and two hours later, I was looking at this:

Granted, it's only a flatcar, and I still have to stain/paint the frame, and install proper trucks, and couplers, and grab irons, and stirrups, and...  The point is, I've been dreading this task, and it turned out to be INCREDIBLY easy, and tons of fun.  I'm hooked...

The frame is a simple wooden box frame, with stringers for additional support.  The decking is individual basswood planks, pre-stained in an India ink/alcohol solution:

The truck bolsters are wood as well, sanded to shape.  The trucks I stole, temporarily, from a plastic reefer car.  I need to research the proper trucks for a wood-framed car from the early 1900's, and purchase the brake components and other details for the underbody.  Oh, and install a couple of additional cross-braces:

Once I'm satisfied that I can build a decent flatcar, I'm going to use this same construction technique to build a wooden caboose, like this one:


Wednesday, April 20, 2011

Throw Another Log On The Fire

My potbelly stove finally arrived (along with a nasty email from the seller, telling me that I have a poor attitude because I was unhappy about waiting a month for delivery).  Oh well.  The stove is installed, the stovepipe and chimney are installed, and I even chopped some firewood!

The stovepipe is a piece of sprue from an old plastic model kit, with a small piece of styrene tubing glued on top.

The tubing is there to hold the section of pipe in place that extends through the roof:

One more look from the side:

Saturday, April 16, 2011

Not Out Of The Woods Yet

#506 exits the forest as it enters Hill City, but I'm not out of the woods yet.  Another afternoon spent "planting" trees, and I barely managed to get a second hill covered.
 

Same shot with a reefer car:
 

Same car, different angle.  I think this is my favorite photo:

Wrapping up with a wider long-range view:

Friday, April 15, 2011

A Few More Details

I took the produce warehouse with me to the local NMRA division meeting last night, and ended up giving a little "how-to" presentation.  Totally unexpected, so I just made it up as I went along.  I must have done OK, because it seemed to be well-received by the audience.

Each night this week I've added a few additional detail items to the structure.  It's almost done, still waiting on the potbelly stove, and the assorted crates and boxes that will be stacked inside.

Looking inside with the end wall removed:

Apples and sacks of potatoes:

The full front-side view.  Pumpkins are visible through one open door.  Crates of onions sit on a hand truck, waiting to be moved inside, or possibly loaded onto a rail car:

Another look inside, with the roof removed:

Over Yonder Hill

The forest has begun taking on a third dimension, in the sense that I now have a hill in front of a hill:

I'm not really in a railroad mood tonight, but I wanted to accomplish something, so I spent an hour or so applying the dirt & leaf ground cover to two more hills.

This is the furthest, hardest-to-reach corner on the layout, and my plan is to completely finish this section first, then work outwards from there.  I'm beginning to regret building this thing three feet deep, but I think it will pay off in the end.

A couple of staged shots to show off tonight's work:

In this one, I purposely focused on the hill, not the car.  That bright yellow really messed with the auto-color on the camera:

Monday, April 11, 2011

Details, Details

The clock is ticking, I have five weeks to complete the produce warehouse before the Thousand Lakes Region convention.  I've become quite unhappy with the eBay seller from whom I ordered the majority of my detail parts - it's soon to be three weeks since I placed the order, and none of those items have arrived yet.  Time to lodge a complaint.  Somewhere, out there, is a large assortment of wooden crates, two pot-belly stoves, and wooden barrels, all with my name on them.

I'm not totally stuck, however.  A few parts from other sources have arrived, and I've started assembling and painting those, pretty much at random.  Here's a quick roundup of what what I've done thus far....

Door handles (some rust streaks running down the door would be nice):

A record-breaking pumpkin:

A crate of onions:

A shovel and a barrel:

A hand-cart and a push broom:

Sunday, April 10, 2011

If A Tree Falls In The Forest...

...and there's nobody around to hear it except one little HO scale guy, does it make a sound?  Probably, but with this steam locomotive roaring past, who would hear it?

As you can see, I've finished "planting" the forest on my first hill.  There are hundreds of individual "trees" here, cut from a craft broom (photos below) purchased at Michael's, a handful painted white to represent birch trees, and a few covered in dark green turf to represent pine trees.  Very labor intensive, but I have created the stark winter look that I wanted.

A wide-angle shot:

The broom from which the trees were cut:


One final shot, just for fun, showing the produce warehouse with the forest in the background:

Friday, April 8, 2011

I Am Not An Artist

Multiple failed attempts to paint a forest full of trees has convinced that I am not an artist.  If you read my last post, you know what I'm trying to create.  All of my best efforts this week have ended up looking like vague multi-colored blobs, not like trees at all.

Yesterday, while taking a long lunchtime walk, I studied the wooded hillsides around me.  I realized that, in spite of the thousands of trees covering those hillsides, you couldn't see them.  Only the first couple of foreground rows were visible, the rest just disappeared.


You literally can't see the trees for the forest.  With that realization, an idea hit me.

A few weeks ago, I bought something called a "grapevine broom" at Michael's.  This is a wooden craft item, truly a broom made out of several pieces of grapevine bound together.  My intent was to cut it apart and use some of the thicker pieces for making pine trees.  Turns out there is another use for it - flat, nearly two-dimensional background trees.  I've discovered that if I layer these three or four rows deep against the backdrop, with my "root" trees in front, I can make a convincing forest:

This means that my backdrop painting simply needs to be a vague brownish-tannish-grayish hill-shaped blob. The layered trees will prevent a clear view of the backdrop, while allowing the overall shape and color to show through.  Armed with this new revelation, I went to work.

After a couple of hours of work, I now have the gloomy gray winter sky that I wanted, along with the brownish-tannish-grayish hill-shaped blob:


The paints that I used cost me $7, all from the "oops" paint section at Home Depot.  The sky is a very light pinkish-orange, almost white flat paint, with a flat gray brushed over it while still wet.  Before the paint dried, I went over the entire thing with a wet paintbrush dipped in water, to help blend the colors together.  The hills are a chocolate brown, yellow, and gray, each applied while the underlying coat was still wet.

Monday, April 4, 2011

Inspiration

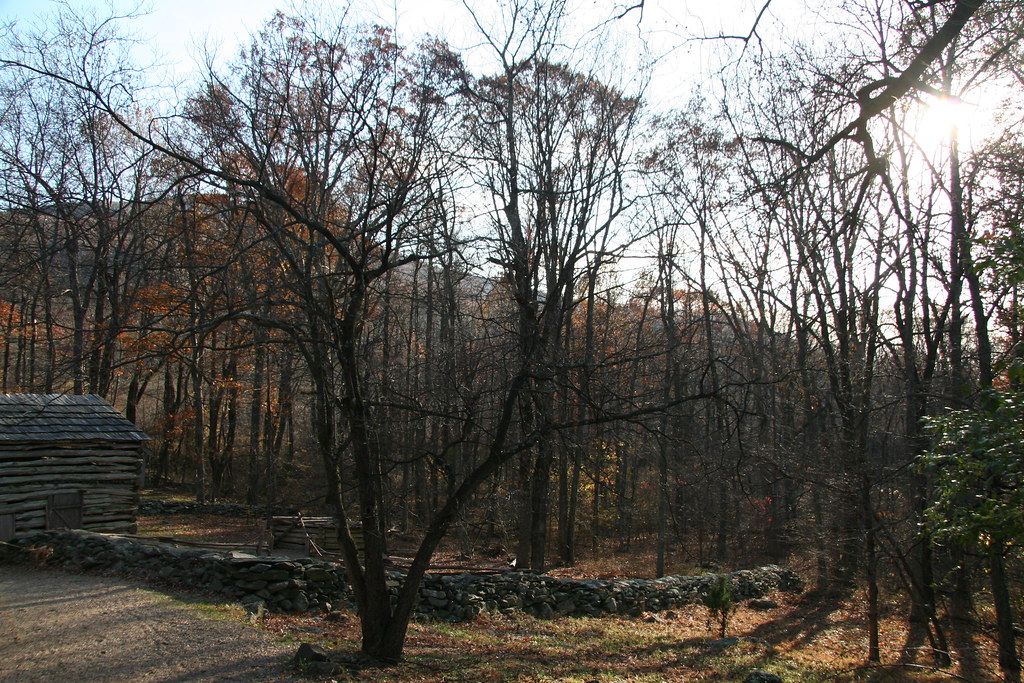
I'm posting this picture for one reason, and one reason only - inspiration.  This is the "bar" which I've set for myself with regard to my backdrop and trees.  I want to recreate this look (without the building and stone wall).  I want the detailed foreground trees (already achieved using plant roots), in front of the dense autumn/winter forest background.  Somehow I'm going to learn how to paint this....


Any artists in the audience want to stop by?

Sunday, April 3, 2011

Touch Of Gray

An important part of the cold late fall/early winter look that I want is the sky.  I really want to portray the steely gray color of a cold overcast fall day.  I have to repaint parts of the backdrop anyway to clean up the brown paint that I slopped on it, so I decided to experiment with some different colors.  The real sky outside today is exactly the color that I want, and since the trees are still bare, I was able to take a couple of photos capturing the entire look.

The real sky:


I very carefully and precisely slopped together some random blues, whites, and grays, and came up with a sky color that I believe "nailed it":